FAQ
Facilitators using Xorro-Q
| Question | Answer | ||||||||||||||||||||||||||||||||||||||||||||||||||||||||||||||||||||||||||||||||||||||||||||||||||||||||||||||||||||||||||||
|---|---|---|---|---|---|---|---|---|---|---|---|---|---|---|---|---|---|---|---|---|---|---|---|---|---|---|---|---|---|---|---|---|---|---|---|---|---|---|---|---|---|---|---|---|---|---|---|---|---|---|---|---|---|---|---|---|---|---|---|---|---|---|---|---|---|---|---|---|---|---|---|---|---|---|---|---|---|---|---|---|---|---|---|---|---|---|---|---|---|---|---|---|---|---|---|---|---|---|---|---|---|---|---|---|---|---|---|---|---|---|---|---|---|---|---|---|---|---|---|---|---|---|---|---|---|
| Where will I find my LTI Consumer Key? |
When you set up LTI for your Institution so that Xorro-Q can exchange data with your Learning Management System, you will need to create a Consumer Key, and provide this to your LMS as well as a "shared secret". To create or find these keys : - log into your QF.xorro.com page (you must be an institution manager); – On your profile menu (click on your name, top right), select Xorro-Q Institution Settings; - At the bottom of that page, where “LTI Support” should be checked (to enable LTI for your institution), you’ll see a link to “Manage LTI Keys”. Follow this link to create or find your Consumer Key and the "Shared Secret" key. |
||||||||||||||||||||||||||||||||||||||||||||||||||||||||||||||||||||||||||||||||||||||||||||||||||||||||||||||||||||||||||||
| I have ordered and paid for some Xorro Workbook licenses. What next? |
If you have ordered Workbook (or Alphateach) licensing from our web store and have asked to be invoiced, then you will receive your invoice and an order confirmation by email. At this stage your order is on hold until your invoice is paid. If you have any problems in concluding the payment process please contact us on sales@xorro.com. Once payment is received, we will update your account details. You will then be able to use your Customer Key to activate the software. You can of course download the software at any time from http://update.xorro.com. This will work as a fully functional 30 day trial. Activating the software using your Customer Key will enable its ongoing use beyond the trial period.
|
||||||||||||||||||||||||||||||||||||||||||||||||||||||||||||||||||||||||||||||||||||||||||||||||||||||||||||||||||||||||||||
| Can multiple facilitators work with the same group (or course)? |
The short answer is, yes. However, the following notes explain some practicalities:
The above constraints can can lead to some issues where multiple facilitators are co-managing a course of study (ie a "group" for Xorro's purposes). Specifically: where an activity has been started by one Facilitator, only that Facilitator's login can be used to access participants' results associated with that activity. Also, only that login can edit or manage that running activity. To get around this, sometimes a shared Facilitator login is used where it is desirable to have multiple facilitators able to simultaneously manage an activity ( and view results). Being logged in to the same running activity using the QF.xorro.com site, multiple facilitators (using the same login) can successfully coordinate their efforts. Naturally, any action taken by any user of the same Facilitator login has equal weight and will be acted upon! Some further care is needed in the case of two persons using the same Facilitator login to access a running real-time activity:
|
||||||||||||||||||||||||||||||||||||||||||||||||||||||||||||||||||||||||||||||||||||||||||||||||||||||||||||||||||||||||||||
| Adding a hyperlink to the Fee Policy text |
Sometimes when preparing the message which will introduce a Fee Policy to a participant enrolling in a group, the Facilitator needs to add hyperlinks to explanatory web pages. This is supported within the fee policy editing form, as follows:
Example In the following example, the red text is the additional HTML code. Note that this includes the destination page for the hyperlink: "You are enrolling in the course "Fundamentals of Structures". Enrolment costs US$9.80. <a href="http://www.xorro.com/help">Click here</a> to view the course page." The above example will present to the participant as follows: "You are enrolling in the course "Fundamentals of Structures". Enrolment costs US$9.80. Click here to view the course page."
|
||||||||||||||||||||||||||||||||||||||||||||||||||||||||||||||||||||||||||||||||||||||||||||||||||||||||||||||||||||||||||||
| How do participants see their results / feedback? |
Xorro-Q provides facilitators with options to provide participants with automated feedback to their responses at an appropriate time determined by the facilitator. These options are determined when the activity is being launched. The behaviour experienced by the Participants depends on the type of activity (real time, or self-paced). Generally speaking, feedback can be delivered to Participants either following each question, or at the end of the activity, or both. Feedback to Participants in Real-Time activitiesOptions when launching the activity ... Participant feedback during activity .... Participant feedback at the end of the activity 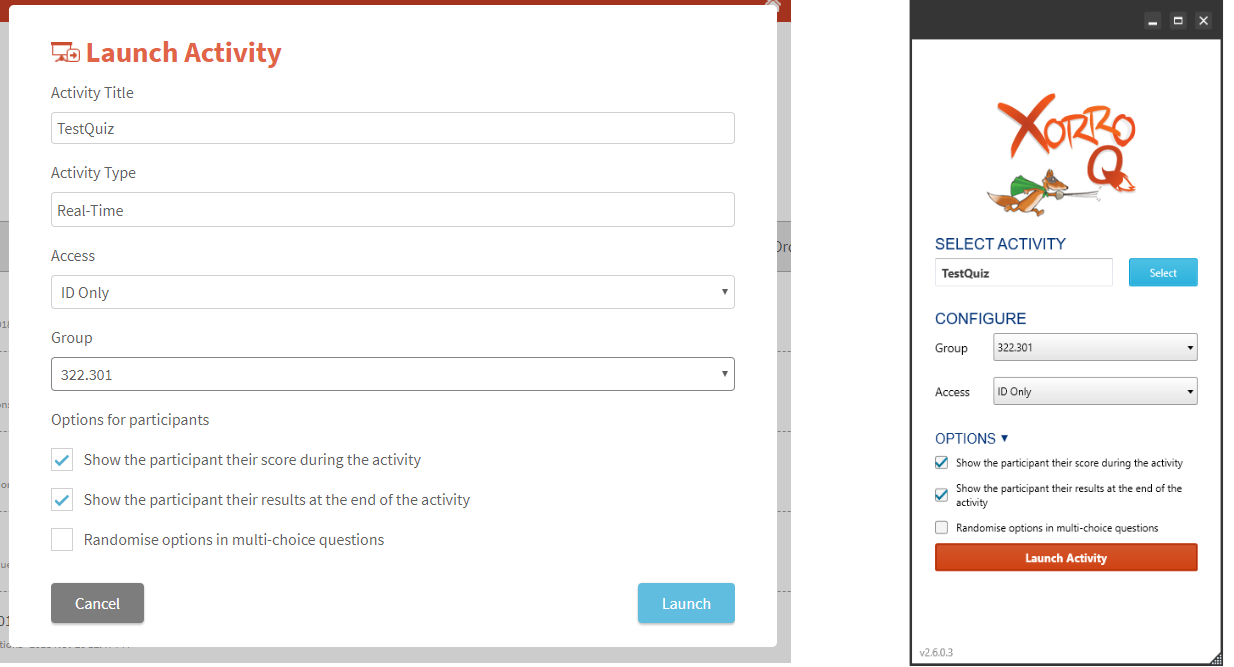 Choosing options when launching a Real-Time activity:When the facilitator is launching the activity the relevant "options for participants" are displayed on the launch form. Figure 1 (right) displays this form as experienced when launching an activity from the QF site, and when using Q-Launcher . Note that if Q-Launcher is being used, facilitator must expand the "Options" section on the launch form (after selecting the activity) to view these. The Facilitator can select for the following participant options:
Participant feedback during the activity: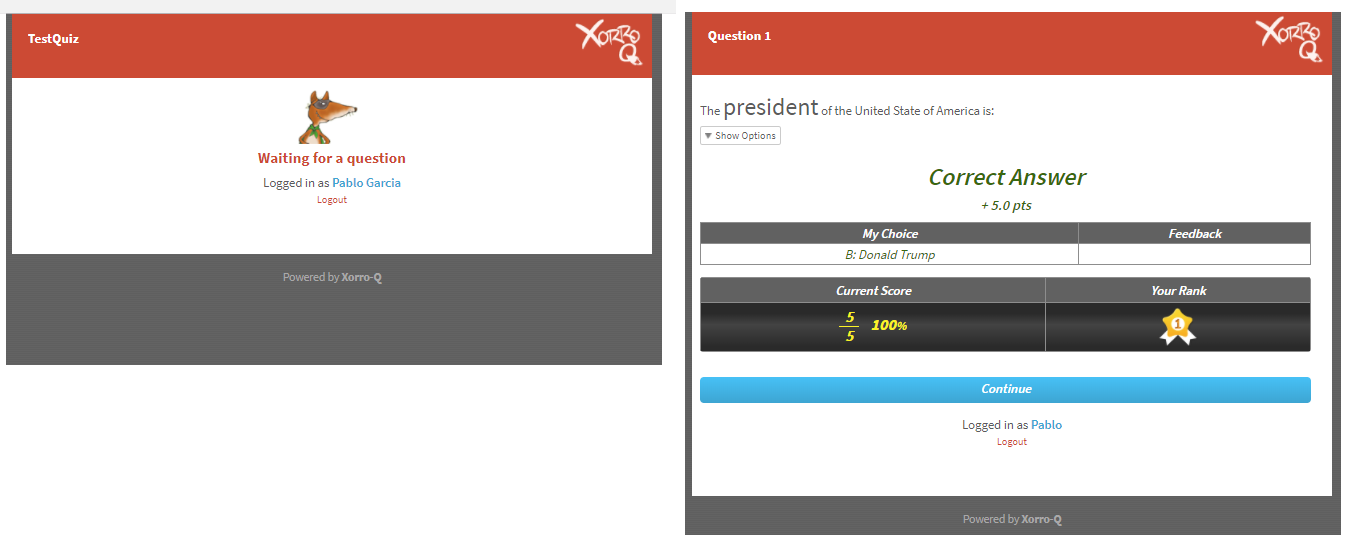 If the first check box is not selected, ie Facilitator witholds feedback during the activity, then on submitting a response to each question the participant will be directed to the next question. If there are no more questions in the running question batch then a "waiting for question" page is delivered (see Fig 2.) Selecting to "show participants their score during the activity" will ensure that the participants receive feedback immediately after submitting responses to each assessable question. This feedback is provided on a new page served to the participant device following their pressing "submit" for their response (see Fig.2). The feedback consists of three elements: - Correct" status: Participant is informed whether their response is a "Correct Answer", "Incorrect Answer", or "Partial Answer." - Score: The score assessed for this response is provided immediately below the Correct status. The score is shown with a "+" or "-" to indicate the influence on the participant's total score (as in some cases a Facilitator may choose for specified responses to reduce the over all score). - Feedback: The participant's response is indicated, and next to this any feedback which has been prepared for this response is provided. - Current Score and Rank: The Participant's current score and rank relative to others in the group are recalculated subject to the last question. To progress to the next question the participant must press the blue 'continue' bar at the foot of this question feedback page. If the question just answered was an only question or the last question in a batch, then the participant witll be directed to a "waiting for question" page (Figure 2, left image).
Participant feedback at the end of the activity: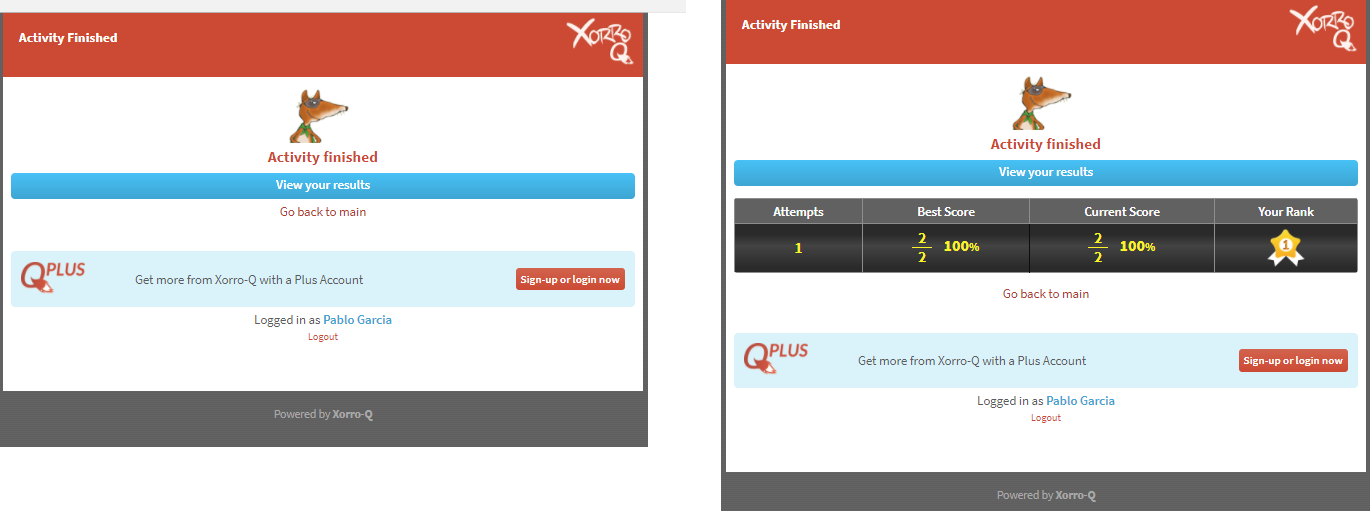 If the facilitator has selected the second option "Show participant results at the end of the activitty", then when the facilitator ends the Real-Time activity the participant screen will switch to a form which provides a link through which participants can access their full result set for the entire activity. If the first option as well as the second are ticked, then this final screen will also display the participant's score and rank from the last question (or question batch). By clicking to view activity results, the participant will see listed their responses to each question, the score awarded in each case and any feedback, and at foot, a summary of the total score and rank achieved for the activity. The participant will be able to download this form at this time. However, if the participant leaves this page their access to the results will be lost - unless they have a Plus account. Plus account holders have a login access to Xorro-Q through which they can view a longitudinal history of all of their past results, and delve into each to explore detail. Read more about Participant Plus accounts. Feedback to Participants in Self-Paced activitiesChoosing options when launching the activity ... Participant feedback during the activity .... Participant feedback at the end of the activity 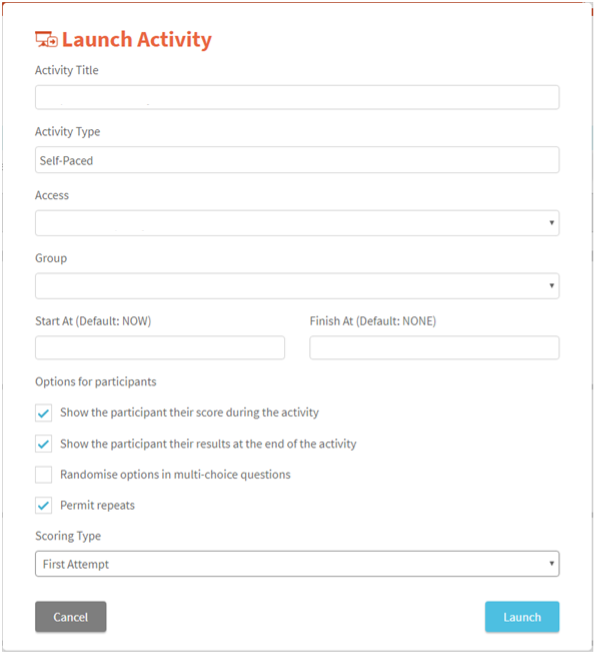 Choosing options when launching a Self-Paced activity:Self-paced activities can only be launched from the Facilitator's QF site (ie qf.xorro.com); the Q-Launcher application can be used only for Real-Time activities. When the facilitator is launching the activity the relevant "options for participants" are displayed on the launch form. The Facilitator can select for the following participant options:
If repeats are permitted, the Facilitator can then choose which of the Participants' attempts is to be repoprted from the Gradebook (either First attempt, or Best attempt). Participant feedback during the activity: If the first check box is not selected, ie Facilitator witholds feedback during the activity, then on submitting a response to each question the participant will be directed to the next question. If there are no more questions in the running self-paced activity then the participant is directed to the end of activity page (below, see Fig 6.) Selecting to "show participants their score during the activity" will ensure that the participants receive feedback immediately after submitting responses to each assessable question. This feedback is provided on a new page served to the participant device following their pressing "submit" for their response (see Fig.5). The feedback consists of three elements: - Correct" status: Participant is informed whether their response is a "Correct Answer", "Incorrect Answer", or "Partial Answer." - Score: The score assessed for this response is provided immediately below the Correct status. The score is shown with a "+" or "-" to indicate the influence on the participant's total score (as in some cases a Facilitator may choose for specified responses to reduce the over all score). - Feedback: The participant's response is indicated, and next to this any feedback which has been prepared for this response is provided. - Current Score and Rank: The Participant's current score and rank relative to others in the group are recalculated subject to the last question. To progress to the next question the participant must press the blue 'continue' bar at the foot of this question feedback page. Note: If the participant stops responding to the activity at this (or any) point, and logs in again later, the participant will be redirected to the place where he or she left off, to continue responding to the activity. Participant feedback at the end of the activity: If the facilitator has selected the second option "Show participant results at the end of the activity", then when the participant reaches the end of this Self Paced activity (or when the Facilitator ends it), the participant screen will switch to a form displaying a summary result for the activity (see Fig 6, left image). On this final screen the participant can choose to follow a link to view the activity results, or (if repeats are permitted) to repeat the activity from the start. By clicking to view activity results, the participant will see listed their responses to each question, the score awarded in each case and any feedback, and at foot, a summary of the total score and rank achieved for the activity. In the case where multiple attempts have been permitted, the participant will be able to view the results for either their more recent attempt, their first attempt, or their best scoring attempt to date (see Figure 6, right image). The participant will be able to download their activity results so long as the activity remains running. However, if the activity is ended by the Facilitator (or according to the activity End Time), participants' access to their results will be lost - unless they have a Plus account. Plus account holders have a login access to Xorro-Q through which they can view a longitudinal history of all of their past results, and delve into each to explore detail. Read more about Participant Plus accounts.
|
||||||||||||||||||||||||||||||||||||||||||||||||||||||||||||||||||||||||||||||||||||||||||||||||||||||||||||||||||||||||||||
| What information is available to the Participant through the Plus account? |
On logging in to a Plus account, the participant will have the option of viewing their results history, or viewing their Plus account details and transactions. Selecting the first of these (view Results) will present the participant with a list of all past activity results, by Institution. These are listed in date order, with the oldest at the top of the list and the most recently added result at the bottom of the list. If the Participant has Results associated with more than one Institution, then a results list will be provided for each institution where institutions are ordered alphabetically. The results list displays (from left to right) the activity name, the number of attempts the Participant has made on this activity, and the best score from these attempts. Clicking on the activity name from within the list will direct the participant's browser to the detailed "best result" page for that activity. This is the same page which was reported to the participant on the completion of the specific activity result in question.
How do Participants create a Plus account? How do Participants access their Plus account?
|
||||||||||||||||||||||||||||||||||||||||||||||||||||||||||||||||||||||||||||||||||||||||||||||||||||||||||||||||||||||||||||
| How do Participants access their Plus accounts? |
The easiest and fastest way for a Participant to access his or her Plus account is by browsing to q.xorro.com/PLUS, and logging in using their Plus account login (usually an email) and their password. The participant can also go to this Plus account login page by following links from either the facilitator URL, or at the end of any activity (on viewing the Activity Results final page).
How do Participants create a Plus account? What information is available to the Participant through the Plus account? |
||||||||||||||||||||||||||||||||||||||||||||||||||||||||||||||||||||||||||||||||||||||||||||||||||||||||||||||||||||||||||||
| How do Participants create a Plus account? |
To create a Plus account, browse to q.xorro.com/PLUS. At the foot of the form, select "Get a Plus account". You will need to provide an email, first name and last name, and create a password. Submitting this data will then direct you to a payment page. On completion of the payment, your Plus account will work. If for any reason you do not complete your payment at this point, your Plus account will not function properly until your payment has been completed. In this case browse to q.xorro.com/plus and login using the credentials you created. You will be redirected to a Purchases page from which you can resolve a Pending Payment. How do Participants access their Plus account? What information is available to the Participant through the Plus account? |
||||||||||||||||||||||||||||||||||||||||||||||||||||||||||||||||||||||||||||||||||||||||||||||||||||||||||||||||||||||||||||
| How do I check that a Xorro-Q assignment running from the LMS is presenting the way I expect it to for students? |
Facilitators can use an LMS such as Canvas or Moodle to run Xorro-Q activities. This is done by creating an assignment in the LMS, and then selecting Xorro-Q as an external tool to run it. The assignment is then linked to a LTI activity in Xorro-Q. Only activities set up as "LTI" activities can be linked for integration to the LMS in this way. The students will only be able to access this assignment by logging in through the LMS. The Facilitator URL, which is used by participants to access activities which are not LTI-linked, will not display an LTI-linked activity. This is to enforce the integration of data with the LMS. A frequent frustration expressed by facilitators using LTI to run Xorro activities from their LMS, is that they want to be able to check how students experience the assignment. Canvas (and other LMS alternatives) provide a student's eye view of the assignment link and pages in the LMS, however clicking the link to the Xorro-Q activity will deliver an ID login form instead of linking to the student view of the activity. This is because the Facilitator (not a student) is logged in to the LMS, and therefore the LMS is unable to pass a genuine student credential to Xorro-Q. In some cases, enterring a valid student ID into the Xorro-Q login will not work either - particularly if it is the first time that that student ID has been used in Xorro-Q to access an activity linked to the relevant Group (or course). Explanation: In an LTI activity, the LMS system "enrolls" students one by one into the group in Xorro-Q as the students click on the link to the activity. The LMS takes care of authenticating who has access to the activity, and Xorro-Q just accepts the students' credentials passed on by the LMS, and adds these as participants in the group which is authorised to access the LTI activity. This process (of enrolling the student in the group) only takes place when the student is actually logged in to the LMS, and clicks on the activity link (in the assignment). If it's an instructor who has logged in to the LMS, and who then uses "student view" to click on the activity link, no credentials are passed across, so Xorro naturally requests the incoming participant to identify (hence the login form). The only reliable way to view a student view of the activity is to log in to the LMS as a student, and follow the student process of clicking through the assignment to the Xorro-Q activity. You might prefer to have a test student ID set up for this purpose. Where to find "student view" in Canvas:In Canvas, you can view an assignment as though you were a student, even though you do not have a student access. If you have a lecturer or admin or probably other “higher” access rights to the assignment (in the course) then do the following to get a “student view”:
You are now in student view. It is made obvious by the pink frame. Student mode is obviously quite restricted (ie to what students can do). To exit and return to your normal mode, select “Leave student view” at the bottom of the frame.
See also: Integrating Xorro-Q with your LMS Using Xorro-Q with your LMS via LTI (Facilitator instructions) Where will I find my LTI Consumer Key? Reporting Participation points, or Scores? Practice Activities: making activities repeatable, and reporting first- or best-score from multiple attempts |
||||||||||||||||||||||||||||||||||||||||||||||||||||||||||||||||||||||||||||||||||||||||||||||||||||||||||||||||||||||||||||
| I am moving to another institution. Can I keep my account? |
Your Facilitator account is secured to your Institution, so it cannot be "moved" as such. However there are means by which you can transfer specific content to a new account in a new institution. This article offers some suggestions on this process. Do not be tempted to open a second Free facilitator account within your (old) institution Xorro account but using your nrew institution email. Whilst this will work, it will create quite a few headaches for you and others. Most importantly, any groups you create will be visible to other Institution Managers (IM's) at your old institution, and this means that their memberships (your new students) will also be visible to those IM's. Although their activity responses ("results") and grades etc will not be visible to others, they are being bundled into the "wrong" institution account which technically means you would be sharing your students' data with a third party. Furthermore, you would still be treated as a member of staff from the old institution so you would have access to their groups (and student lists) and any resources shared within the institution. The correct path to take is to join your new employer's Xorro account (if they have one), or set up a new account. To join an existing institution account you can either: - ask an Institution Manager to create a new facilitator account in the Institution, If your new employer does not yet have a Xorro account, then you can easily set up a new institution account for them (with you in it as a Free facilitator and Institution Manager). Transfering your content (questions you have created)If you want to transfer any content you created while with your old employer, the following approach will help: Global sharing from your old account: Login to your old account. Go to the Q-Bank tab, and import any questions you want to to access in future from your old activities (see: How can I import quantities of questions into Xorro-Q?). Make sure to tag these question as you import them, with relevant tags which will make it very easy for you to find them later (often the original activity name can be a helpful tag). Also make sure to set sharing level to Globalso that the questions can be "found" from another institution. Accessing from your new account: Now login to your new account (in the new institution). In Q-Bank, you can run a Global search for the tags you created earlier, to find the questions you imported. If you want to use them in an activity the best way is to create the activity in the usual way, then click on "Import questions" button and perform the (global) search and select process. This brings a copy of the selected questions into your new Facilitator account. Stop global sharing: If you want to stop sharing the questions, you will need to log back into your old account. Set the search Scope to "Mine" or "Institution", not "Global". Search for the tags you used, and select the questions you want to stop sharing. Once you have made your selection, you will be able to select "Edit Metadata" button at the top of the question list; in the "Share to" field select "Mine". This retracts the global sharing for the selected questions. Deleting your old content: If you want to delete the questions you can do so by deleting the original activities in your old account. This will not affect any copies you may have created in your new account. If your questions were "asked" of participants at any time (and responses were offered), then these "Results" (including a copy of the originally asked questions) cannot be deleted.
|
||||||||||||||||||||||||||||||||||||||||||||||||||||||||||||||||||||||||||||||||||||||||||||||||||||||||||||||||||||||||||||
| "Dots" and short strokes do not appear when drawn into Workbook (or Alphateach) using touch. |
Some users experience the following problem: Using Workbook (or AlphaTeach) with an interactive LED display or interactive whiteboard, they dot an 'i' or cross a 't', or just draw a very short hypen or dash on the canvas - and it does not appear on the page. The behaviour does not occur if using a mouse: the shortest of strokes, or just dots, appear OK on the Workbook canvas when made with the mouse instead of the touch device. To help with troubleshooting: There are several potential sources for this behaviour (short ink strokes and dots not being drawn), the most obvious being: - Hardware filters touches – All touch systems have filters built in to their firmware which are designed to eliminate noise. By noise I mean spurious touches: a touch signal which is not a “real” touch signal. Different suppliers adjust these filters for greater or lesser sensitivity depending on the market. (In Australia for example, we’re all aware of their problem with flying insects…. And being able to neglect the effect of a fly landing on the display without consequence to a human finger’s input, is of some advantage there!) The kind of filter which is of greatest concern is looking at the minimum “touch-down-and-drag” distance before a signal is passed as a “real” touch intention. Obviously, the drag component of this algorithm will impact on such real-world needs as placing a dot over an “i” or crossing a “t”…. - Hardware reduces touch sampling - In addition, the device “samples” the touches at a prescribed rate. This sampling rate may drop under certain circumstances – eg if the usb transmission bandwidth is inadequate, or if the device is instructed by a driver to drop its sampling rate. Obviously, reducing the sampling rate increases greatly the likelihood that a dot over the “i” or a stroke over the “t” is overlooked and not reported. - Connectivity – The interactive display’s connection to the computer (via usb cable in most cases) is a point of vulnerability. Every touch, every drag, every mouse action is communicated over this cable. In addition, the device may have to send other data over the cable, or the cable may also be connected to a hub and be handling data from other devices (eg video feeds) causing bandwidth constraints. USB is tolerant of noise such that a poor signal can simply mean less sampling of the touch gets through to the computer. In other words: if your usb cable is too long, or if there are several connection points (sockets etc), or there is some other source of noise, or there is too much data being sent over the one USB connection, then the available “bandwidth” is compromised and touch responsiveness will drop: ie not just lag, but also actual data loss occurs. One of the very first symptoms of this to the user is the inability to make short ink strokes or dots. - Computer & OS - Touch signals from your device pass through the usb port into your computer and are interpreted by Windows (or other OS) through a queueing system. Sometimes, if the computer is light on processing and there’s a lot of demand placed on it, then it can take some time for the queue of inputs to be processed. This generally presents as a delay and catch-up of mouse actions rather than as missing inputs (such as a missing ink dot or stroke). – So I doubt this is the issue! - Drivers - Drivers installed on the computerwill directly influence thesampling and filtering of touch signals. Sometimes a driver will reduce sampling rates or filter noise, perhaps in response to the bandwidth available for communications with the device. We see both responsiveness impacts and also filtering leading to data loss, resulting from drivers interpreting the touch signals. - Software – There are a few cases in which the application software’s design will impact on whether or not it acts on touch information being received. Efficient touch application software today will use the touch functionality built into Windows 7, 8 and 10 in preference to the standard HID (Human Interface Device) drivers used for mouse or other pointing devices. Workbook / Alphateach interfaces correctly with the native Windows touch functionality. The software will need to input the touch signals from the queue, and interface with drivers which control the touch device. |
||||||||||||||||||||||||||||||||||||||||||||||||||||||||||||||||||||||||||||||||||||||||||||||||||||||||||||||||||||||||||||
| Setting the Timer for your Questions |
There will be times you will want to limit the time avauilable for a participant to answer a question, or a set of questions such as a quizz. A timer is available for you to use on questions and on batches (of questions) in Real-Time activities only. Where will I find the Timer? On the QF site, go into your Real Time activity (in activity tab). In the Question List view, you'll see the Timer control button above the question controls at the far right of each question (or batch)...:
This lets you set the time permitted to answer the question. Either adjust the timer manually by using the + or - buttons above each digit, or choose one of the convenient 'presets' at the foot of the form. Press 'Set" to complete the process.
|
||||||||||||||||||||||||||||||||||||||||||||||||||||||||||||||||||||||||||||||||||||||||||||||||||||||||||||||||||||||||||||
| Problems with completing Workbook / Alpha Teach Activation |
The activation process relies on: - The current version of the software; - An effective internet connection to the Xorro licensing server; - Sufficient remaining activations available on the license; - Appropriate write access permissions to specific folders on the user's computer.
Use the latest version of the softwareThe current version of the software may be obtained from http://update.xorro.com. Enter your Customer Key to download the latest version of the software to which your support subscription entitles access. If your support subscription has expired, you can continue to use older versions of the software and these should activate without problems. However, Xorro cannot maintain past versions of the software, so if there is any activation problem with an old version the only remedy available through Xorro, is to subscribe to support and access the latest version of the software. Use your Customer KeyThe activation process is tied to your Customer Key. If you use a different key, this may not work at all. If you do not know your Customer Key, please ask your dealer to help. Effective Internet ConnectionThe activation process involves an exchange of data between the user computer and Xorro's on-line activation server. This requires a live internet connection. As an alternative, activation can be performed off-line for a specific computer, by extracting data to create a code. A different device which is connected to the internet, is then used to send this code to the Xorro Server and obtain a response code. This response code can then be keyed into the user computer to complete the activation. Please check 'Ensuring Workbook connectivity across your network' to ensure Workbook / AlphaTeach can access relevant services and sites over the internet. Sufficient remaining activationsLicenses for the software are often limited to a specific number of devices on which the software may be installed and activated. As devices are activated, the numberof possible future activations reduces. See Licensing of Workbook / Alpha Teach and Activating Workbook & Alpha Teach for details. Appropriate write access permissionsThe activation relies on being able to make and save changes to files in the C:\ProgramData\Alpha Teach folder (default location). If the files cannot be changed, or if this folder is subjected to being cleansed of any changes, then the activation may not succeeed, or may not be saved. Please ensure that ProgramData folders can receive changes ie are not read-only. |
||||||||||||||||||||||||||||||||||||||||||||||||||||||||||||||||||||||||||||||||||||||||||||||||||||||||||||||||||||||||||||
| Welcome to New Facilitator |
Customer, you are enrolled as a Facilitator under [INSTITUTION]'s Xorro account. Your login and password have been sent to you. Note that passwords are case sensitive! Please change your password as soon as possible. Do this by editing your Profile. Your Facilitator URL is : q.xorro.com/ABCD (This is the url your participants browse to in order to join and participate in your sessions). Your login enables you to create and edit activities, and to enrol participants and groups of participants. You can then run your activities (either in live audience sessions or as self-paced, or practice, activities) so that participants can access these in ways which you can specify. If you are working with large groups (over 33 participants) or if you need to ask lots of questions (more than 100 per month) then you will need a Plan to maintain uninterrupted easy use of Xorro-Q. Otherwise, the Free Facilitator plan will enable you to do everything. Learn about plans.... Some ideas on how you might use Xorro-Q:- Run live quizzes, contests or assessment games;
Please feel free to request help if you need it; we are only an email away! |
||||||||||||||||||||||||||||||||||||||||||||||||||||||||||||||||||||||||||||||||||||||||||||||||||||||||||||||||||||||||||||
| Welcome to New Institution Manager |
Customer, your user account in Xorro has been set up as a Xorro “Institution Manager" for Organisation. What can Institution Managers do in Xorro-Q?Administrators (or "Institution Managers") in Xorro-Q can perform all the functions of a Facilitator. In addition, they have overview of all Xorro-Q functions in the institution, for example:
Many administration functions are accessed through the drop-down profile menu which appears top right of the display once you are logged in to any xorro.com site. Only Institution Managers will be able to access "My Institution" and "Xorro-Q Institution Settings". "My Institution"Select "My Institution" to manage your institution's account, add or edit users, allocate Xorro-Q plans to users, change your Xorro-Q plans, and access institution-wide reports. From your profile menu, select "My Institution". The "Institution Dashboard" which appears gives you an instant view of institution-wide metrics, for all facilitators and all participants. On the left of the page you will see three menu groups: The top relates to your personal account; the second relates to the institution's account; the third provides access to Help. In the Institution's "Profile" you can edit the Institution details. Under "Users" you can view and edit all facilitator users in the Institution. You can add new users; you will be able to assign these Institution Manager privileges if required. Under "Licenses" you can access the institution's Xorro-Q license. Click on the "Allocate Users" button to selectively allocate your users to available Plans. You can click through to buy more Plans or extend your urrent ones as well. "Reports" provides a range of institution-wide reports on engagement. "Xorro-Q Institution Settings"Select "Xorro-Q Institution Settings" to adjust how Xorro-Q is experienced by Facilitators and Participants across the entire institution. Participant Login Methods define how participants access activities run by facilitators in this institution. They can be set as defaults which a Facilitator can change, or they can be enforced. Self enrolment settings define the participant experience around self-enrolment (if permitted). See You can select the currency which will apply to any Fee Policies you might establish. You can also permit activities to be set up as LTI enabled (meaning that they can be accessed and run through an LMS such as Moodle or Canvas). Learn more about LMS integration To use Xorro-Q for yourself:If you want to prepare an activity in advance, then go to http://qf.xorro.com (your home page), and visit the activities tab; go from there. You can get hints if you need them from http://www.xorro.com/help/61. For Help:See the on line guides, especially “Xorro-Q in 7 Bites”. Of course, please feel free to request help if you need it; we are only an email away! |
||||||||||||||||||||||||||||||||||||||||||||||||||||||||||||||||||||||||||||||||||||||||||||||||||||||||||||||||||||||||||||
| Workbook System Requirements |
System Requirements
Workbook contains some features that take advantage of improved touch functionality in Windows 7, Windows 8 and Windows 10 (specifically, multiple simultaneous touch reporting, gestures such as puinch-scale and rotate, and scroll). For this reason some features will not be available on older versions of Windows. Workbook's open-hand-erase functionality requires the touch deevice to report touch size in the prescribed manner. If it does not then the touch size will not be detected and Workbook will not initiate an eraser for open hand touches. |
||||||||||||||||||||||||||||||||||||||||||||||||||||||||||||||||||||||||||||||||||||||||||||||||||||||||||||||||||||||||||||
| Who are the Institution Managers at my organisation? |
Login as a Xorro user, and refresh this page to see a list of Institution Managers at your Organisation. If you do not yet have a Xorro login for your institution, tell us which institution you want to join and we will contact the Institution Manager for you. |
||||||||||||||||||||||||||||||||||||||||||||||||||||||||||||||||||||||||||||||||||||||||||||||||||||||||||||||||||||||||||||
| How can activities be restricted so that only group members can access them? |
When launching an activity, there are two key settings to check:
Assigning the activity to a Group, and
Setting how Participants access the activity.
Assigning the activity to a Group determines how the results from the activity will be organised. If the activity is not set to a Group, then later analysis by group (eg by class or by course) would be impossible. Generally we recommend that this setting be set by default to force the selection of a Group for every activity when it is run.
Setting how the activity is to be accessed by participants, determines how rigorously you identify who is accessing the activity. There are several options:
- "Alias only" - this is the least secure method. As there is no specified ID, participants who use alias to access activities cannot be individually tracked across sessions;
- "ID only" - this performs all the required tracking by participant. However, anyone with a valid ID can enter even if not part of the group. This is often desirable eg when students in a university have not yet enrolled in a course but still require participation during the first few weeks of course;
- "ID or Alias" - This allows participants to choose to use an alias instead of an ID eg if they are guests and do not have an ID, or if they wish to remain anonymous;
- "Selected Group Only": this locks the session access to only members of that group. Other ID holders cannot gain entry to the activity. This is frequently required, and in some institutions is the default access method. Be aware however that any participants not "enrolled" into the course, cannot access the activity!
It is possible to set your groups up such that self-enrollment by participants is permitted. In this case, group-only access is the preferred access method.
|
||||||||||||||||||||||||||||||||||||||||||||||||||||||||||||||||||||||||||||||||||||||||||||||||||||||||||||||||||||||||||||
| What happens when a merge request is rejected, or is left unanswered? |
If a merge request is not answered then the source and target institutions proceed as before the request was made, ie without any impact whatsoever on either. Merge requests do not have any definitive expiry. |
||||||||||||||||||||||||||||||||||||||||||||||||||||||||||||||||||||||||||||||||||||||||||||||||||||||||||||||||||||||||||||
| Using prefixes and suffixes in Numeric Response Questions |
It is common to set either a prefix, or a suffix, or both, for a numeric response question. These can ber specified by adding the relevant characters to the prefix and suffix fields in the question editor. A string of up to 5 characters is permitted for the prefix; up to 8 characters are allowed in a suffix. The character(s) used in the prefix or suffix will then be displayed (to the left and to the right respectively, of the value entry field) on the participant device. Common prefixes are currency symbols such as Can$; common suffixes include units such as km, kN, or other explanatory text strings such as "units" or "lengths." Example 1: A numeric question requires a correct answer of "25" (or its numeric equivalent, plus or minus whatever tolerance may have been specified). The prefix "$" is specified, as is a suffix of ".00". The relevant section from the question editor form is displayed below on the left; the effect on the participant's response screen is shown on the right:
As an aside: The use of the suffix ".00" in this case is not really necessary since Xorro-Q is testing for the arithmetic equivalence of the participoant's respoinse to the set string. In this case, the intent is to correctly assess a response of "25"however a participant who enters "25.0" or "25.000" will also be marked as correct. However, if a participant enters $25" the response will not be accepted, as a numeric string is required. The user will not be penalised. Example 2: A question anticipates a response in a specified unit of MPa. This would normally be made clear in the question text (eg "Express you answer in MPa to zero decimal places), however the use of the suffix in this case acts as an added reminder for the participant as it displays the required units next to the entry field. The relevant section from the question editor form is displayed below on the left; the effect on the participant's response screen is shown on the right:
|
||||||||||||||||||||||||||||||||||||||||||||||||||||||||||||||||||||||||||||||||||||||||||||||||||||||||||||||||||||||||||||
| Using tolerances in Numeric Response Questions |
It is possible to specify a tolerance for a numeric response question; answers within the tolerance will be assessed as "correct" and reported as such. Tolerance may be set as a +/-integer value or as a +/- % of the correct value. If one of these is set, its equivalent will be calculated and displayed in the corresponding field. Important: When setting tolerance using the integer value, be aware that the tolerance accepts values within the prescribed limits. A response qual to the prescribed limit will be assessed as wrong. Example: A question has a correct value of 2001, and tolerance set at +/- 1. (The equivalent tolerance of +/-0.049975% is displayed in the proportional tolerance field). Any response greater than 2000 and less than 2002 will be assessed as correct. A participant's answer of 2002 will be marked wrong (as it is equal to the tolerance value, but not within the range). |
||||||||||||||||||||||||||||||||||||||||||||||||||||||||||||||||||||||||||||||||||||||||||||||||||||||||||||||||||||||||||||
| My Workbook / Alphateach document does not display the same way it did when created |
Sometimes a user complains that a document created on one computer does not display correctly on a different computer. The text is grossly magnified relative to shapes, images and lines drawn on the pages. The distortion can completely ruin the purpose of the document. This is a known frustration, but is easily avoided if you know the cause.
The problem has to do with the computers being set to different display magnification preferences:
In Windows 10, right-click your display and select "Display Settings". In the popup window which presents, under "Scale and Layout", note the field titled "Change the size of text, apps and other items". There is a range of magnification options available from the drop-down selector, including the recommended one of 100%.
If a document is created on one display magnification setting but then opened on a computer using a dfifferent setting, the result will be that the text in the document will be enlarged. However, since the document remains locked to the desired size (by default, A4) this may conflict with other layout considerations intended by the author, specifically the placement and size of the text relative to other objects on the page.
If the document is opened on any computer with its display magnification set to the same display magnification as that used when the document was created, then it will display correctly.
IMPORTANT NOTE: It is not enough to simply change the setting while the document is open. Workbook / Alphateach must be restarted after the magnification setting is changed, in order for it to take effect.
For the avoidanvce of any problems, the use of the recommended display setting of 100% is of course promoted. However if a different setting is preferred then using this across the entire workgroup (including both the authoring and presenting computers) should avoid any presentation problems. If a particular computer's setting is different by preference, then quickly adjusting this before opening the document is suggested in order to avoid presentation problems.
|
||||||||||||||||||||||||||||||||||||||||||||||||||||||||||||||||||||||||||||||||||||||||||||||||||||||||||||||||||||||||||||
| Are Groups linked to Facilitators? |
In Xorro-Q, Groups are not tied or linked to specified Facilitators. A Group can be created by anyone with appropriate permissions, and subsequently can be accessible to other Facilitators in the same Institution. Thus, an administrator may import a CSV defining a large set of potential Participants organised into Groups. Facilitators create Activities, define how these Activities can be accessed (by Groups or by Participants), and have unique access to the Results arising from Participants accessing those Activities. Therefore, a Facilitator can (by assigning activities to a specified Group) gain access to Results data associated with members of that Group accessing those Activities. No other Facilitator can access those Results data.
See also: Participant Teams & Teamsets Groups Setting Up Participants & Groups How can I.....Make sure my participants are recognized and organised into groups How can I.....Run an activity I have prepared, with a group of participants How can activities be restricted so that only group members can access them? |
||||||||||||||||||||||||||||||||||||||||||||||||||||||||||||||||||||||||||||||||||||||||||||||||||||||||||||||||||||||||||||
| Can a participant answer a question more than once? |
Allow multiple submissions? (Ignored in batch) Answer can only be submitted once / Answer can be submitted multiple times / Replace previous answer
|
||||||||||||||||||||||||||||||||||||||||||||||||||||||||||||||||||||||||||||||||||||||||||||||||||||||||||||||||||||||||||||
| What is my Facilitator URL? |
It is also displayed at the top of the Q-Launcher application. In case you are logged in while viewing this Help article, your Facilitator URL is: q.xorro.com/ABCD |
||||||||||||||||||||||||||||||||||||||||||||||||||||||||||||||||||||||||||||||||||||||||||||||||||||||||||||||||||||||||||||
| How do Participants find your activity? |
To invite participants to a running activity: For a Live (Real-Time) Activity: - Give participants your Facilitator URL. If you have other (self paced) activities running at the same time, participants will then need to press the blue "Live Session" button. - Display the QR code (either from Q-Launcher, or from the running page on your QF site). Scanning this with a QR code reader will take participants directly to your running Real Time activity. For a self-paced activity: - Give participants your Facilitator URL and ask them to select the relevant activity from the list of running activities; or - If you have created an "activity permalink" for this activity, give the permalink to your participants. Important note: When an activity is created, a unique id is generated for this activity. This id is used to access the activity during editing. When the activity is run, a copy of the activity is created along with a new activity id which is then used in an activity url to access the running activity. This permits changes to the original activity to be saved without corrupting the running activity's results. Using an "activity permalink" allows a Facilitator to automatically replace a running activity with a changed version of the activity. The participants will experience this seamlessly, however a new Results set will be generated.
See also: Facilitator URL Custom Facilitator URL Will the QR code / Facilitator URL always be the same? Activity URL Activity Permalink
|
||||||||||||||||||||||||||||||||||||||||||||||||||||||||||||||||||||||||||||||||||||||||||||||||||||||||||||||||||||||||||||
| How much do Facilitator Plans cost? | |||||||||||||||||||||||||||||||||||||||||||||||||||||||||||||||||||||||||||||||||||||||||||||||||||||||||||||||||||||||||||||
| Consequences of using Alias logins only |
Using "alias" access for participants allows an activity to be run anonymously, since there is no way to connect a participant's result with a particular individual outside of the session (or even within the session if the participant chooses an alias which does not point to them explicitally). There are several significant disadvantages to using Alias logins, however. If participants can use an "Alias" login to access an activity, the individual result produced from those participants can not be linked to any other data outside of the activity (for example, it cannot contribute to a longitudinal view of those participants' results). Also, if (during the session) these participants exit the activity by closing their browsers, and then later re-enter the activity, they will be recongised as different participants (even if they use the same alias to identify themselves). If this occurs frequently it will distort participation data and results. It can also be manipulated by participants as a means to disproportionately affect the output from the session, as one person could emulate the inputs of several different people by using multiple aliases. For these reasons, it is generally recommended that ID should be enabled as a login method, AND at the very least, an "ID or alias" login method is set as institution-wide default, and that facilitators use ID only as a preferred login method where ID is supported by the institution. See Institution Settings: Participant Login Methods Otherwise, Facilitators and Institution managers should consider Xorro-Q's easy participant-self-enrollment, in which participants create an "ID on the fly" and enroll into a group along the way, typically using an email. See Self-Enrolling Participants and Self-Enrolling Participants to a Fee-Paying Group
|
||||||||||||||||||||||||||||||||||||||||||||||||||||||||||||||||||||||||||||||||||||||||||||||||||||||||||||||||||||||||||||
| How do I register as a new Xorro-Q user? |
There are plenty of good reasons to become a Free Facilitator in Xorro-Q. To list just a few:
Free Facilitators have full access to Xorro-Q to author, share, access and run activities. Constraints only apply to the size of the largest class, course or group of participants accessing these activities. Different Facilitator Plans allow an Institution to flexibly buy capacity on Xorro-Q and share this around its staff. Xorro-Q also supports participant-funded alternatives. Read more about Plans and Pricing... There are two easy ways to join up as a Free Facilitator in Xorro-Q:
Signing up as a Free FacilitatorTo sign up as a Free Facilitator, complete the short form at www.xorro.com/free_accounts/new. You'll need to enter your first and last names, your email address, and you'll need to choose a username and password for your account. Your username just needs to be unique; some people use their email address as a username but any unique alphanumeric string will do so long as it uses ordinary characters and has no spaces or punctuation. Your password is case sensitive (but username is not). You will also have to identify the organisation with which you work (why is this needed?) As you start typing the name of your organisation into the field, Xorro will list any institution accounts which have similar names so you can choose one of these if appropriate. If your organisation is not among those listed then select "Create a new organisation" to create your new institutional account in Xorro-Q. If you selected one of the listed organisations, your account will be set up initially as a fully-functional stand-alone institution. Your details will be sent as a "merge request" to the institution managers for the account you chose, asking them to approve a merger of your new institution account with the chosen account. Until they approve, you will not have access to data from the other facilitators in the institution (such as group and participant lists, shared resources etc). Buying a Facilitator PlanFree Facilitators have generous limits to what they can do in Xorro-Q. However, if you are running a large group and need to use Xorro-Q intensively, you will want to choose a Facilitator Plan, or consider a Participant Funded model. Your first steps with Xorro-Q:Once you've joined up, check out our Getting Started guide: Xorro-Q in 7 Bites
See also: Who are the Institution Managers at my organisation? What can Institution Managers do in Xorro-Q? I am moving to another institution. Can I keep my account? Merging your institution with another institution account |
||||||||||||||||||||||||||||||||||||||||||||||||||||||||||||||||||||||||||||||||||||||||||||||||||||||||||||||||||||||||||||
| Why does having an account in Xorro-Q require an organisation to be identified? |
When signing up as a Facilitator in Xorro-Q, you are required to identify the organisation with which you work. This is needed in case you might need to share data with other people in your organisation at some future time. There are many cases in which this is required, including the following: - Share with other facilitators in the same organisation any questions or activities you have created, and access any resources they wish to share with you (see: How can I.....Share prepared activities or just questions with other Facilitators; Using Q-Bank to Find and Manage Questions; What do the terms "Mine", "Institution" and "Global" mean in the Q-Bank sharing and search functions?) - Access groups (ie participant lists, course organisation etc) across the institution, so they are administered from one source rather than relying on each facilitator to reimport them (see: Setting Up Participants & Groups; How can I.....Make sure my participants are recognized and organised into groups; Importing Participants, Teams and Groups; Can I import all participants and groups for the institution, together at one time?) - Integrate Xorro-Q activities with your organisation's Learning Management System (LMS), so that participants can access them by logging in through bthe LMS, and all results are automatically applied to the Gradebooks in the LMS. (see: Integrating Xorro-Q with your LMS; Using Xorro-Q with your LMS via LTI (Facilitator instructions)
See also: I am moving to another institution. Can I keep my account? What can Institution Managers do in Xorro-Q?
|
||||||||||||||||||||||||||||||||||||||||||||||||||||||||||||||||||||||||||||||||||||||||||||||||||||||||||||||||||||||||||||
| How do I view or correct the Team Composition in a running peer assessment activity? |
View the team compositionSelect the ‘Team Composition’ button for the Activity for which you wish to adjust the team composition Correct the team composition
Note: DO NOT adjust the contents of the Column headed ‘group_code’ in your Participants CSV file. The Peer Assess Pro Activity will continue. All students in teams affected by a change in composition will be notified by an automatically generated email to resubmit their peer assessment responses. Reason: They now have different team members to rate. The remaining teams of the class will be unaffected. |
||||||||||||||||||||||||||||||||||||||||||||||||||||||||||||||||||||||||||||||||||||||||||||||||||||||||||||||||||||||||||||
| How do I decide which Personal Result method to apply in my peer assessment activity? |
The choice of calculation method for determining a team member’s personal result is determined by the teacher's preference for compensating more strongly team members who have contributed significantly to their teams, and under-rewarding team members who are peer assessed as weak contributors. The figure illustrates the statistical features, such as team average, range, and standard deviation, associated with each method. Alternative calculation methods for Personal Result (PR) illustrating effect on team average and spread for a given Team Result
The teacher can select either the Peer Assessed Score (PA Score) or Peer Assessed Index (PA Index) if they wish to exclude a team result in calculating the Personal Result (PR). More usually, the Peer Assessed Score and Team Result (TR) are combined mathematically to produce a Personal Result. There are three alternative methods. As the figure illustrates, the Indexed Personal Result (IPR) is the least discriminating method, whilst the Rank-Based Personal Result (RPR) is the most discriminating in terms of favouring significant team contributors and penalising weak contributors. Most teachers select the Normalised Personal Result, often with a spread factor of 1.5 to 2.0. In contrast to the graphical illustration earlier, the following table summarises the example calculations presented through a series of FAQ that present the mathematical definition and example calculations for each method.
Comparison of Personal Results calculated by several methods in a team of four members
Source: FAQ: How are peer assessment and personal results calculated and defined mathematically?
Definitions and features of calculation methods used in Peer Assess Pro
Note that in the Xorro PAP app, we have renamed the following Personal Result Methods Renaming of terms for Xorro Peer Assess Pro
Also see: Participant Teams and Teamsets Group Peer Assessment What is the Purpose of Peer Assessment? What questions are asked in the peer assessment survey? How is the Peer Assessed (PA) Score calculated? How are peer assessment and personal results calculated and defined mathematically? Running Peer Assessments from Xorro-Q Importing Participants, Teams and Groups How do I view or correct the Team Composition in a running peer assessment activity? How do I decide on which Personal Result method to apply in my peer assessment activity? Peer Assess Pro website Peer Assess Pro Reference Guide (PDF) |
||||||||||||||||||||||||||||||||||||||||||||||||||||||||||||||||||||||||||||||||||||||||||||||||||||||||||||||||||||||||||||
| What questions are asked in the peer assessment survey? |
The Peer Assess Pro survey measures one overall assessment, Recommendation, followed by ten quantitative ratings, then several qualitative questions. The ten quantitative ratings are used to calculate the Peer Assessment Score (PA Score). The ten ratings are categorized into two classes: Contribution to Task, and Contribution to Leadership and Teamwork, as shown in the example survey below. In addition, two qualitative questions are asked that request examples of behaviours supporting the quantitative ratings in relation to Contribution to Task, and Contribution to Leadership and Teamwork. Finally, the assessor is asked to provide Development Feedback. That is, advice that would help the team member improve their future contribution to the team. The ten questions used as the basis for calculating the Peer Assessment Score are adapted from: Deacon Carr, S., Herman, E. D., Keldsen, S. Z., Miller, J. G., & Wakefield, P. A. (2005). Peer feedback. In The Team Learning Assistant Workbook. New York: McGraw Hill Irwin.
Also see: Participant Teams and Teamsets Group Peer Assessment What is the Purpose of Peer Assessment? What questions are asked in the peer assessment survey? How is the Peer Assessed (PA) Score calculated? How are peer assessment and personal results calculated and defined mathematically? Running Peer Assessments from Xorro-Q Importing Participants, Teams and Groups How do I view or correct the Team Composition in a running peer assessment activity? How do I decide on which Personal Result method to apply in my peer assessment activity? How do students know where and when to complete the peer assessment activity then review their results? Peer Assess Pro website Peer Assess Pro Reference Guide (PDF) Example Peer Assessment Survey: Quantitative
Example Peer Assessment Survey: Qualitative
|
||||||||||||||||||||||||||||||||||||||||||||||||||||||||||||||||||||||||||||||||||||||||||||||||||||||||||||||||||||||||||||
| What is the purpose of peer assessment? |
Defining peer assessmentPeer assessment is an educational activity in which students judge the performance of their peers, typically their teammates. Peer assessment takes several forms including
Developmental feedbackThe ability to give and receive constructive feedback is an essential skill for team members, leaders, and managers. Consequently, your teacher has chosen to use Peer Assess Pro™ to help you provide developmental feedback to your team members, for both formative and/or summative purposes. The goal of developmental feedback is to highlight both positive aspects of performance plus areas for performance improvement. The result of feedback is to increase both individual and team performance (Carr, Herman, Keldsen, Miller, & Wakefield, 2005). Determination of course personal resultAdditionally, your teacher may use the quantitative results calculated by Peer Assess Pro™ to determine your Personal Result for the team work conducted by your team. Your Personal Result may contribute to the final (summative) assessment grade you gain for the course in which Peer Assess Pro™ is applied. In general, your Personal Result is calculated from two factors:
Criteria for peer assessment in Peer Assess Pro™There are many possible criteria for assessing your contribution to your team’s work. Peer Assess Pro has chosen to place equal weight on two groups of factors based on a well-established instrument devised by Deacon Carr, Herman, Keldsen, Miller, & Wakefield (2005). The two groups of factors are Task Accomplishment, and Contribution to Leadership and Team processes:
Peer Assess Pro assesses competencies valued by employersThe selection of the criteria used in the Peer Assess Pro is reinforced by the results from a recent survey that asked employers to rate the importance of several competencies they expected to see in new graduates from higher education. The figure shows that teamwork, collaboration, professionalism, and oral communications rate amongst the most highly needed ‘career readiness’ competencies sought by employers. All these competencies rate at least as ‘Essential’, with Teamwork and Collaboration rating almost Absolutely Essential (National Association of Colleges and Employers), 2018).
Source: National Association of Colleges and Employers (NACE). (2018). Figure 42, p. 33.
Further information: Participant Teams and Teamsets Group Peer Assessment What is the Purpose of Peer Assessment? What questions are asked in the peer assessment survey? How are peer assessment and personal results calculated and defined mathematically? How is the Peer Assessed (PA) Score calculated? Running Peer Assessments from Xorro-Q Importing Participants, Teams and Groups How do I view or correct the Team Composition in a running peer assessment activity? How do I decide on which Personal Result method to apply in my peer assessment activity? Peer Assess Pro website Peer Assess Pro Reference Guide (PDF)
References Deacon Carr, S., Herman, E. D., Keldsen, S. Z., Miller, J. G., & Wakefield, P. A. (2005). Peer feedback. In The Team Learning Assistant Workbook. New York: McGraw Hill Irwin. National Association of Colleges and Employers (NACE). (2018). Job Outlook 2019. Bethlehem, PA. https://www.naceweb.org/
|
||||||||||||||||||||||||||||||||||||||||||||||||||||||||||||||||||||||||||||||||||||||||||||||||||||||||||||||||||||||||||||
| How do participants with Plus accounts see their past result history? |
If an activity can be accessed only by members of a group which is subject to a fee policy, then all members of that group will have Plus accounts. With a Plus account, the participants can view their personal results history: In other words, they can see a log of all of their past attempts on Xorro-Q activities; they can see an instant summary of their score; they can also drill into the linked activity result to view the individual question response data.. There are two ways for a Plus account participant to see their history: 1. Log in directly at q.xorro.com/plus. Upon logging in, select "View Results" from the menu.
|
||||||||||||||||||||||||||||||||||||||||||||||||||||||||||||||||||||||||||||||||||||||||||||||||||||||||||||||||||||||||||||
| Setting default page and text (font) values in Workbook & AlphaTeach |
In Workbook and AlphaTeach, the default page and default font value can be set in two ways... 1. Within the software: To change the choice of default page size and orientation: Go to the Tools>Options menu. The first tab allows change of the default page size and orientation (there are many other behaviours and user presentation parameters which can be set in this and other tabs). These settings will apply to the curent session but will not be retained after the document is closed unless the document is saved. The act of saving the document will apply the chosen values to become defaults for any new documents. To change the choice of default font and font colour: In any document, add a "Text" button to your Personal Toolbar. Right-click on the button to set its properties. Select the desired font and font colour for the default font and font colour. Then type some characters onto the document and confirm the settings are as desired. Once happy, you must save the document to apply the settings as defaults. (You can always deleted the saved document later). 2. Changing values directly in the configuration files: When Workbook (or AlphaTeach) opens, it acquires its default values from the following configuration files: FigureTools.ini; PersonalToolbar.xml; Spotlight.xml; Workbook.ini. Depending on whether you are using Xorro Workbook or AlphaTeach, these files are found in one of the following folder locations: C:\Users\User\AppData\Roaming\Xorro Workbook\ Note that these locations may differ if your software has not been installed using the default Windows folder destinations. The initial font and font colour values are stored in the file FigureTools.ini. Open this file with any text editor such as Notepad or Wordpad (do not use Word). Scroll down until you find the section headed [Text]. It should look similar to the following: [Text] Fill = 255,255,255,255 The lines which relate to the initial font settings are those indicated above in red. Make sure that you use the font name precisely as it appears in your fonts directory. Save the file making sure not to retain the .ini extension. Then close and re-start Workbook (AlphaTeach) to observe the new setting..
|
||||||||||||||||||||||||||||||||||||||||||||||||||||||||||||||||||||||||||||||||||||||||||||||||||||||||||||||||||||||||||||
| Ensuring Workbook & Alphateach connectivity across your network |
Most customers use a proxy server to manage internet access by clients from within their networks. Workbook and Alphateach require access to certain URL's in order to function correctly. Following is a list of the URL's for which your proxy must allow exceptions: xorro.com update.xorro.com: Required for activation and support web.xorro.com: Required for activation and support portal.xorro.com: Customisable portal for your Workbook/Alphateach browser account.xorro.com: Set up Facilitator account; access Facilitator account (create activities, set up groups etc); share and access resources resources.xorro.com: share and access shared resources api.q.xorro.com: Q-Launcher requires this to run Q activities api.flickr.com: Required for Resource Finder www.youtube.com: Required for Resource Finder www.googleapis.com: Required for Resource Finder commons.wikipedia.org: Required for Resource Finder
In addition, it may be necessary to install a Flash Player plug (for access by Internet Explorer) for some operating systems, in order to view YouTube videos in Workbook/Alphateach. |
||||||||||||||||||||||||||||||||||||||||||||||||||||||||||||||||||||||||||||||||||||||||||||||||||||||||||||||||||||||||||||
| What is a "Participant Plus" account? | |||||||||||||||||||||||||||||||||||||||||||||||||||||||||||||||||||||||||||||||||||||||||||||||||||||||||||||||||||||||||||||
| Recovering a Forgotten Username or Password |
If you forget your password, just go to the usual login form: Browse to http://qf.xorro.com, and when the login form appears, select "Forgot your password?" link. In the following form, enter your email address. Provided that this matches the email address set up in your profile, an email will be sent to you identifying your username, and providing a link through which you can change your password. Still having trouble:If you forget your username and the email which was associated with it, then you need to check in with your Institution Manager. Don't create a new "Free Facilitator" account! as there's no way to merge the data from that account with your past account data. To maintain continuity, it's best you make use of your original account. If you do not know who your Institution Manager might be, please email us for help. Remember to tell us your organisation's name, city, country, your name, and your return email address. We'll do our best to put you in touch with one of your Institution Managers. |
||||||||||||||||||||||||||||||||||||||||||||||||||||||||||||||||||||||||||||||||||||||||||||||||||||||||||||||||||||||||||||
| How do I change my password? |
To change your password in Xorro:
|
||||||||||||||||||||||||||||||||||||||||||||||||||||||||||||||||||||||||||||||||||||||||||||||||||||||||||||||||||||||||||||
| Assigning Plans to Users |
In Xorro-Q, a "Facilitator Plan" is what enables a Facilitator to run live interactive sessions with Participants. If a Facilitator (user) has no plan assigned to it, then that Facilitator will operate under the "Free Facilitator" plan. To remove various limit restrictions which apply, a different plan may need to be assigned to the Facilitator(s). Compare Plans Plans can be assigned and re-assigned at any time. The arrangement is entirely flexible to suit the changing needs of the Institution. To assign plans to Facilitator users:
Plans & Pricing Xorro-Q Plans and Pricing Explained How much do Facilitator Plans cost? Free Facilitators Creating & editing Facilitator accounts in Xorro-Q
|
||||||||||||||||||||||||||||||||||||||||||||||||||||||||||||||||||||||||||||||||||||||||||||||||||||||||||||||||||||||||||||
| Creating & editing Facilitator accounts in Xorro-Q |
In Xorro-Q, a "user" is a Facilitator (a teacher, a trainer, lecturer, presenter etc). This is the person who leads or orchestrates a group activity. Facilitator accounts can be set up in Xorro-Q by any Institution Manager. There is no limit to the number of user accounts which can be created in an Institution. The participation data collected by a user is accessible by that user and by Institution Managers. The following process describes setting up a User account. To create a new Facilitator account:
EITHER add the new user manually...:
OR send user(s) a link to add themselves directly into your institution:
Remember than a new user will not yet have any Plan assigned. By default, any user without a Plan assigned will be a Free Facilitator and therefore is subject to the Free Facilitator restrictions in use. To avoid this, assign a Plan to the user.
|
||||||||||||||||||||||||||||||||||||||||||||||||||||||||||||||||||||||||||||||||||||||||||||||||||||||||||||||||||||||||||||
| What can Institution Managers do in Xorro-Q? |
Administrators (or "Institution Managers") in Xorro-Q can perform all the functions of a Facilitator. In addition, they have overview of all Xorro-Q functions in the institution, for example:
Many administration functions are accessed through the drop-down profile menu which appears top right of the display once you are logged in to any xorro.com site. Only Institution Managers will be able to access "My Institution" and "Xorro-Q Institution Settings". "My Institution"Select "My Institution" to manage your institution's account, add or edit users, allocate Xorro-Q plans to users, change your Xorro-Q plans, and access institution-wide reports. From your profile menu, select "My Institution". The "Institution Dashboard" which appears gives you an instant view of institution-wide metrics, for all facilitators and all participants. On the left of the page you will see three menu groups: The top relates to your personal account; the second relates to the institution's account; the third provides access to Help. In the Institution's "Profile" you can edit the Institution details. Under "Users" you can view and edit all facilitator users in the Institution. You can add new users; you will be able to assign these Institution Manager privileges if required. Under "Licenses" you can access the institution's Xorro-Q license. Click on the "Allocate Users" button to selectively allocate your users to available Plans. You can click through to buy more Plans or extend your urrent ones as well. "Reports" provides a range of institution-wide reports on engagement. "Xorro-Q Institution Settings"Select "Xorro-Q Institution Settings" to adjust how Xorro-Q is experienced by Facilitators and Participants across the entire institution. Participant Login Methods define how participants access activities run by facilitators in this institution. They can be set as defaults which a Facilitator can change, or they can be enforced. Self enrolment settings define the participant experience around self-enrolment (if permitted). See You can select the currency which will apply to any Fee Policies you might establish. You can also permit activities to be set up as LTI enabled (meaning that they can be accessed and run through an LMS such as Moodle or Canvas). Learn more about LMS integration |
||||||||||||||||||||||||||||||||||||||||||||||||||||||||||||||||||||||||||||||||||||||||||||||||||||||||||||||||||||||||||||
| What is Xorro-Q? |
Xorro-Q is a LIVE ("real-time") audience response solution designed to make presentations, lectures, conferences and lessons more involving. Xorro-Q enables participants in any audience to interact with a presenter's computer, using their personal browser-capable mobile devices: mobile phones, tablets, laptops or PCs. Use Xorro-Q to run quizzes, facilitate brainstorms, and formatively assess your audience by asking instant questions as you progress through a presentation or lesson. Xorro-Q provides insightful longitudinal reports on engagement and performance for every participant. The benefit for presenters and institutions is that Xorro-Q improves student retention in courses and achieves improved learning outcomes from groups. Institution managers receive deep insights into the audience experience, and participants report strong motivational value from using Xorro-Q in sessions. Xorro-Q has strongest applications in tertiary and secondary education as well as in any corporate setting where automated audience assessment is desirable. In addition, publishers and authors are using Xorro-Q to provide a game-like auto-assessment experience complement their e-books and articles. Xorro-Q’s motivational game-like approach is also helpful for distribution businesses seeking to influence and train their channel sales people. |
||||||||||||||||||||||||||||||||||||||||||||||||||||||||||||||||||||||||||||||||||||||||||||||||||||||||||||||||||||||||||||
| How can I..... Just try "Xorro-Q" in class, without preparing anything? |
A: Download and install Q-Launcher, and use it to start an activity and ask "Instant Questions." 1. Download the Q-Launcher desktop toolbar from http://qf.xorro.com/pages/xorroq_launcher, and install this (versions are available for either Windows or Mac OS). 2. At the start of class, double-click the Launcher icon (Fox) and login as a Facilitator. Choose the Group (if you have created one – if not, just accept the default settings), and press "Start". 3. Click on the Fox at the top of the toolbar, to collapse the toolbar to a tile; drag the tile to a convenient location on your desktop for later access. Start your presentation. 4. Whenever you want to ask a question of your audience, just click on the Fox tile to expand the toolbar, and select the question type (multi-choice or text response). |
||||||||||||||||||||||||||||||||||||||||||||||||||||||||||||||||||||||||||||||||||||||||||||||||||||||||||||||||||||||||||||
| How can I..... Prepare an activity (such as a quiz or a game) to run later |
A: Log in to your QF site (qf.xorro.com). Go to the activities tab, and create a new activity. You might want to prepare a Real-Time activity in preparation for a future session, or else prepare an activity which participants can access in their own time and at their own pace (a "Self-Paced Activity). In either case: 1. Browse to the Facilitator web site: qf.xorro.com Login using your Xorro-Q login and password; 2. Select "Activities" tab; 3. Create a new activity, and complete the form:
4. Add questions to suit. 5. In the case of a Self-Paced Activity, when launching you will need to specify the date and time of starting and ending the activity (defaults use the current date and time to start). |
||||||||||||||||||||||||||||||||||||||||||||||||||||||||||||||||||||||||||||||||||||||||||||||||||||||||||||||||||||||||||||
| How do I... Launch an activity for a Real Time (live, or synchronous) session? |
A: You can either launch it from the QF site (select the activity and select "Run" from the left hand menu), or else you can open Q-Launcher on your desktop, log in, then select the activity and start it. |
||||||||||||||||||||||||||||||||||||||||||||||||||||||||||||||||||||||||||||||||||||||||||||||||||||||||||||||||||||||||||||
| How do I... Launch an activity for a Self-Paced (a-synchronous) session? |
A: Self-Paced activities cannot be started from the Q-Launcher; you must start it from your QF site (log in, select the activity, launch or run it). |
||||||||||||||||||||||||||||||||||||||||||||||||||||||||||||||||||||||||||||||||||||||||||||||||||||||||||||||||||||||||||||
| How can I.....Share prepared activities or just questions with other Facilitators |
Any Facilitator can create activities, and also can share activities with other Facilitators – either in the Institution, or else Globally. If another facilitator opens a shared activity, then that activity becomes a clone of the original – meaning the second Facilitator can edit and change without altering the original shared activity. To share activities which you have prepared:
To share questions and groups of questions:
To access activities shared by other facilitators in my institution:
|
||||||||||||||||||||||||||||||||||||||||||||||||||||||||||||||||||||||||||||||||||||||||||||||||||||||||||||||||||||||||||||
| How can I.....Run an activity I have prepared, with a group of participants |
EITHER Launch from Q-Launcher
OR launch from QF site:
|
||||||||||||||||||||||||||||||||||||||||||||||||||||||||||||||||||||||||||||||||||||||||||||||||||||||||||||||||||||||||||||
| How can I.....Make sure my participants are recognized and organised into groups |
By ensuring your Participants are in groups, you can support long term tracking of data contributed by Participants. This in turn enables close monitoring of engagement levels as well as results from the activities. To set up your groups manually:
To manually add a Group's participants to another Group:
To import participants into Groups and Teams using a Participants CSV file: |
||||||||||||||||||||||||||||||||||||||||||||||||||||||||||||||||||||||||||||||||||||||||||||||||||||||||||||||||||||||||||||
| How can I.....View Results from a past activity |
When you have "run" an activity (a set of questions) with participants, and responses of some sort have been received from the participants, Xorro saves the outcome as a "Result". (Note: If no responses have been given by participants, then of course no "Result" is saved). Results, therefore, are the convergence of an Activity (ie the question set), with an event (ie date and time) and with a set of participants (who may or may not be pre-registered in a "group"). To find and explore your Results, browse to the Facilitator web site: qf.xorro.com.
"Results" are downloaded in .zip format. On extracting the downloaded zip file, "reports" can be viewed in Excel format or as web file (html). Two reports present the raw data as follows:
|
||||||||||||||||||||||||||||||||||||||||||||||||||||||||||||||||||||||||||||||||||||||||||||||||||||||||||||||||||||||||||||
| Will the QR code / Facilitator URL always be the same? |
A: Yes: Every User (educator, presenter etc) has a unique "Facilitator URL". This is the URL at which that user's activities are available to participant browsers. The URL does not change for that user. The QR code directs a participant to this URL. |
||||||||||||||||||||||||||||||||||||||||||||||||||||||||||||||||||||||||||||||||||||||||||||||||||||||||||||||||||||||||||||
| What's the difference between running an activity from the QF site, and doing so from the Q-Launcher? |
A: At any point in time, there will be some Facilitator functions which are supported in one but not the other, as the interfaces evolve separately. These especially pertain to the dashboard and participant panels. Both Q-Launcher and QF's activity running page however result in the same output, and both result in the same experience for the Participant. The choice of which to use therefore depends on what will be done in the session. Generally, if brainstorming is anticipated then Q-Launcher is a good fit since drag-and-drop to other applications is likely to be attractive (and will not be fully supported from QF's running web page). Otherwise, check the functional differences. |
||||||||||||||||||||||||||||||||||||||||||||||||||||||||||||||||||||||||||||||||||||||||||||||||||||||||||||||||||||||||||||
| What happens if a Group is not selected when launching an activity? |
A: By selecting a Group, results from the activity are tagged to that group. Hence, attendance data is captured and can be analysed. If no group is selected, there is no basis for determining the potential enrolment in the session. Furthermore, engagement histories for groups can only be determined if the data is tagged to the group in the first place. |
||||||||||||||||||||||||||||||||||||||||||||||||||||||||||||||||||||||||||||||||||||||||||||||||||||||||||||||||||||||||||||
| What are the implications of choosing to allow participants to access activities using an alias? |
A: Firstly, the Participant experience will be a little different. If a participant logs in to an activity and then later closes their browser, on re-entering the activity they may not be recognised as the same participant and therefore the total participant count will increase (this is dependant on the participant's device). Secondly, there are significant implications for data collected. Obviously, there is no explicit way of linking an alias to a real person. Xorro-Q treats an alias as specific to an activity, so there is no linking of aliases across activities. Lastly, since an alias is not identified as a member of a group, alias logins cannot affect group engagement data. |
||||||||||||||||||||||||||||||||||||||||||||||||||||||||||||||||||||||||||||||||||||||||||||||||||||||||||||||||||||||||||||
| How can I let Participants join my session anonymously? |
A: Use an "alias" login, and tell participants to use a "Nickname" which does not identify them. |
||||||||||||||||||||||||||||||||||||||||||||||||||||||||||||||||||||||||||||||||||||||||||||||||||||||||||||||||||||||||||||
| When should I use a Self-Paced activity, and when should I use a Real Time activity? |
A: Real Time refers to synchronous teaching, where the facilitator and the Participant are "present" (ie logged in) at the same time. You'll use this feature if you want to actively manage the session while it is running, eg by launching new questions or batches or reacting to participant contributions. A facilitator can only ever have one Real Time activity running at once, but there is no limit to how many self-paced activities can be run concurrently. Self Paced activities are designed to be run without the facilitator being logged in. The Participant simply processes the activities entirely in their own time. Otherwise, there are no differences. |
||||||||||||||||||||||||||||||||||||||||||||||||||||||||||||||||||||||||||||||||||||||||||||||||||||||||||||||||||||||||||||
| How will I know what question was asked, when reviewing the Results from an Instant Question? |
A: You can choose to permit the Q-Launcher to take a screen capture of your display at the instant you press any of the Instant Question buttons. This screen capture is saved with the audience responses. On reviewing the Results after the activity (you will have logged into your QF site and selected the appropriate Result under the Activities tab), look at the results for the question in the Question Report. You will see the screen capture in the space normally reserved for the question image. |
||||||||||||||||||||||||||||||||||||||||||||||||||||||||||||||||||||||||||||||||||||||||||||||||||||||||||||||||||||||||||||
| Can I drag-and-drop text submissions from my participants, onto a Powerpoint or Prezi slide when in slide show mode? |
A: You can drag-and-drop Q-Launcher displayed Results onto any paste-ready context (eg Word, or Excel, or a whiteboarding program etc). Unfortunately, slideshow presentations do not accept a paste command when they are in slide show mode. They do, however, when in edit mode – so you could choose to exit slide show mode, so that the slide is in edit mode, and then drag-and-drop into the slide in question. |
||||||||||||||||||||||||||||||||||||||||||||||||||||||||||||||||||||||||||||||||||||||||||||||||||||||||||||||||||||||||||||
| Can I access the session data after the session? |
A: Yes. If using Q-Launcher, you will be prompted on exit, whether you want to download ("export") the session data; if you do so then the data will be downloaded to your computer as a zip file containing two reports in both CSV and HTML: format – ie four files in total. If you choose not to, or if you are using the QF site for running your activity, then in any case the Results are always available to you from within the Activities tab – filter by "Results" (select filter from left hand side). |
||||||||||||||||||||||||||||||||||||||||||||||||||||||||||||||||||||||||||||||||||||||||||||||||||||||||||||||||||||||||||||
| How can I import quantities of questions into Xorro-Q? |
A: In your QF site, select the Q-Bank tab. Select "Import from CSV". Download a sample file, and manipulate your source to ensure the data is in the same format. |
||||||||||||||||||||||||||||||||||||||||||||||||||||||||||||||||||||||||||||||||||||||||||||||||||||||||||||||||||||||||||||
| What do the terms "Mine", "Institution" and "Global" mean in the Q-Bank sharing and search functions? |
A: By default, any questions in your Q-Bank are stored as "Mine". This means they are not shared with anyone else. If you choose to, you can select question from your Q-Bank and share them either with others in your institution ("Institution"), or with all users of Xorro-Q around the world ("Global"). When searching for questions, the same principle applies, you can search within your own Q-Bank, or within Q-Banks from around your Institution or Q-Banks globally.
See also: Question Scope (in Q-Bank); Q-Bank; Using Q-Bank to Find and Manage Questions; Using tags in Q-Bank; Random Block; Inserting a Random Block of questions into an activity; Question Category (in Q-Bank); Adding new categories to your Q-Bank; How can I import quantities of questions into Xorro-Q? |
||||||||||||||||||||||||||||||||||||||||||||||||||||||||||||||||||||||||||||||||||||||||||||||||||||||||||||||||||||||||||||
| I have imported questions from a third party source (eg a publisher). Can I share these with other facilitators? |
A: Questions attract copyright. If you have sourced your questions from a third party, you should check what copyright is available for these. If they are free to share with other facilitators in your institution, then share them across the institution – global users will not see them. |
||||||||||||||||||||||||||||||||||||||||||||||||||||||||||||||||||||||||||||||||||||||||||||||||||||||||||||||||||||||||||||
| Can I share activities I have created, with other Facilitators? |
Any Facilitator can create activities, and also can share activities with other Facilitators – either in the Institution, or else Globally. If another facilitator opens a shared activity, then that activity becomes a clone of the original – meaning the second Facilitator can edit and change without altering the original shared activity. To share activities which you have prepared:
To share questions and groups of questions:
To access activities shared by other facilitators in my institution:
|
||||||||||||||||||||||||||||||||||||||||||||||||||||||||||||||||||||||||||||||||||||||||||||||||||||||||||||||||||||||||||||
| I'd like to see how engaged participants in my sessions are. Where can I find this? |
A: Login to your QF site. Near the upper right corner of your display, you will observe your name displayed as a button. Hover over this to see the drop-down menu. Select "Profile". This will take you to a personal dashboard of your key data. You'll see Reports are available from the menu on the left. |
||||||||||||||||||||||||||||||||||||||||||||||||||||||||||||||||||||||||||||||||||||||||||||||||||||||||||||||||||||||||||||
| What is the significance of participants who are in the "initiating" stage of the Engagement Cycle? |
A: "Initiating" refers to participants who have logged in to your session, but who have answered less than 20% of the questions you have posed. This could be for a number of reasons: language barriers, lack of confidence, distractions, not understanding your question, etc. In the Engagement Analysis, you can determine what proportion of your audience remains engaged. We suggest that you consider strategies for maximising the Engaged proportion (that part of the audience which answers 80% or more of questions asked of them). |
||||||||||||||||||||||||||||||||||||||||||||||||||||||||||||||||||||||||||||||||||||||||||||||||||||||||||||||||||||||||||||
| The Engagement Reports indicate low attendance levels for some groups and some facilitators, yet I know this is not correct. |
A: In Xorro-Q, "Attendance" is determined by the participant logging in to an activity. Thus, a person may be present physically but cannot "attend" the activity unless they have a browser and have logged in. Certain circumstances can lead to very low attendance values. Using mixed login types (ie where both alias and id are allowed) has the effect of reducing attendance, since alias logins cannot be recorded as group members. Another in-class practice which will distort the attendance data greatly is creating additional participants to act as a "sub-group". In this case, the majority of the class will not be logging in to activities as individuals when these "sub-group" participants log in, and therefore the non-attending level to these group activities will be very high. It is recommended instead to create real groups and assign the activity to those groups in such a case. |
||||||||||||||||||||||||||||||||||||||||||||||||||||||||||||||||||||||||||||||||||||||||||||||||||||||||||||||||||||||||||||
| I can log in to the QF site, but cannot "Run" or "Launch" an activity. Why not? |
A: Check the top right hand corner and see if there is a message indicating that you do not have a current Facilitator License. If you are using a Free Facilitator plan, then you will be restricted to asking no more than 100 questions per month, of audiences of no more than 33 free participants.. In order to be able to run a larger session, or to ask more questions, you need a Facilitator Plan assigned to you. Your Institution Manager is able to selectively allocate Facilitator plans to users through the "Licenses" section in the Dashboard menu. |
||||||||||||||||||||||||||||||||||||||||||||||||||||||||||||||||||||||||||||||||||||||||||||||||||||||||||||||||||||||||||||
| I'm having trouble understanding the various terms used in the graphs and reports |
A: Check the Glossary of Terms. |
||||||||||||||||||||||||||||||||||||||||||||||||||||||||||||||||||||||||||||||||||||||||||||||||||||||||||||||||||||||||||||
| Can I import all participants and groups for the institution, together at one time? |
A: Yes. Check the Import Participants function in the Participants tab. You will need to create a Participants CSV file which includes the participant once for every group in which that participant is a member. See: Importing Participants, Teams and Groups |
||||||||||||||||||||||||||||||||||||||||||||||||||||||||||||||||||||||||||||||||||||||||||||||||||||||||||||||||||||||||||||

 On clicking "Set", the Timer Edit dialogue will appear.


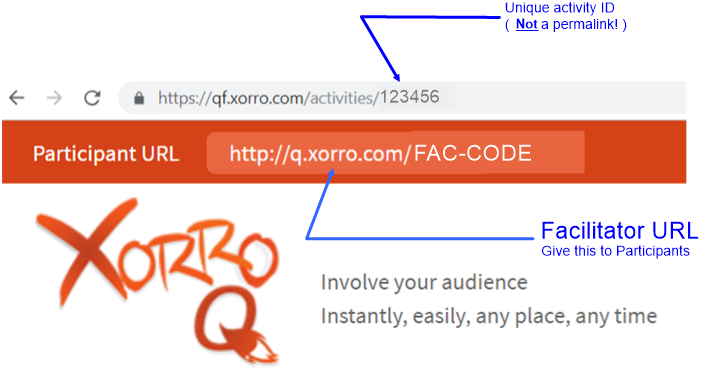 Your Facilitator URL (also called the Participant URL) is displayed at the top of your QF site's pages (see image at right).
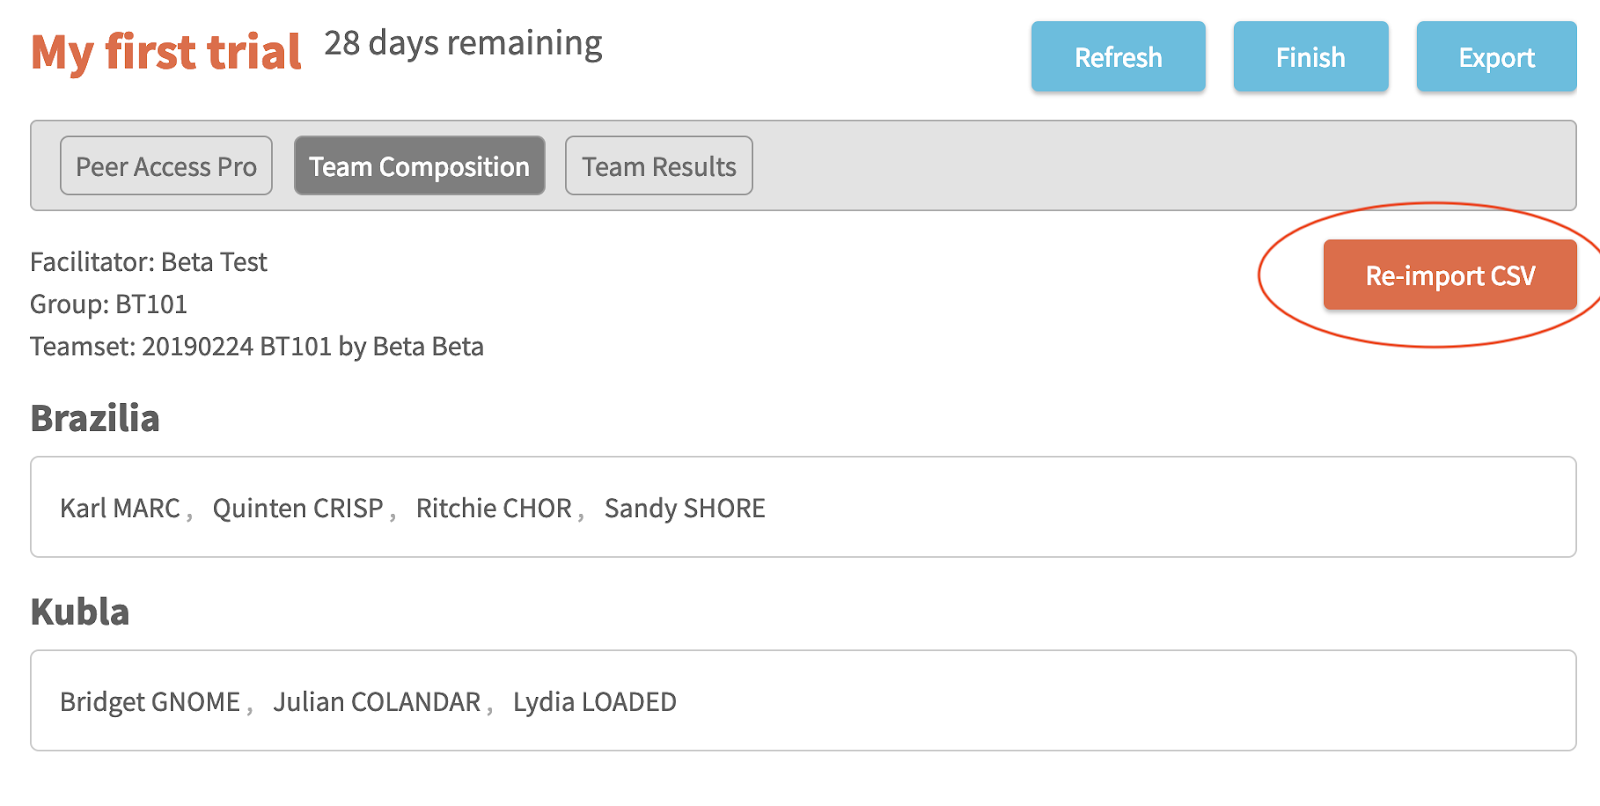
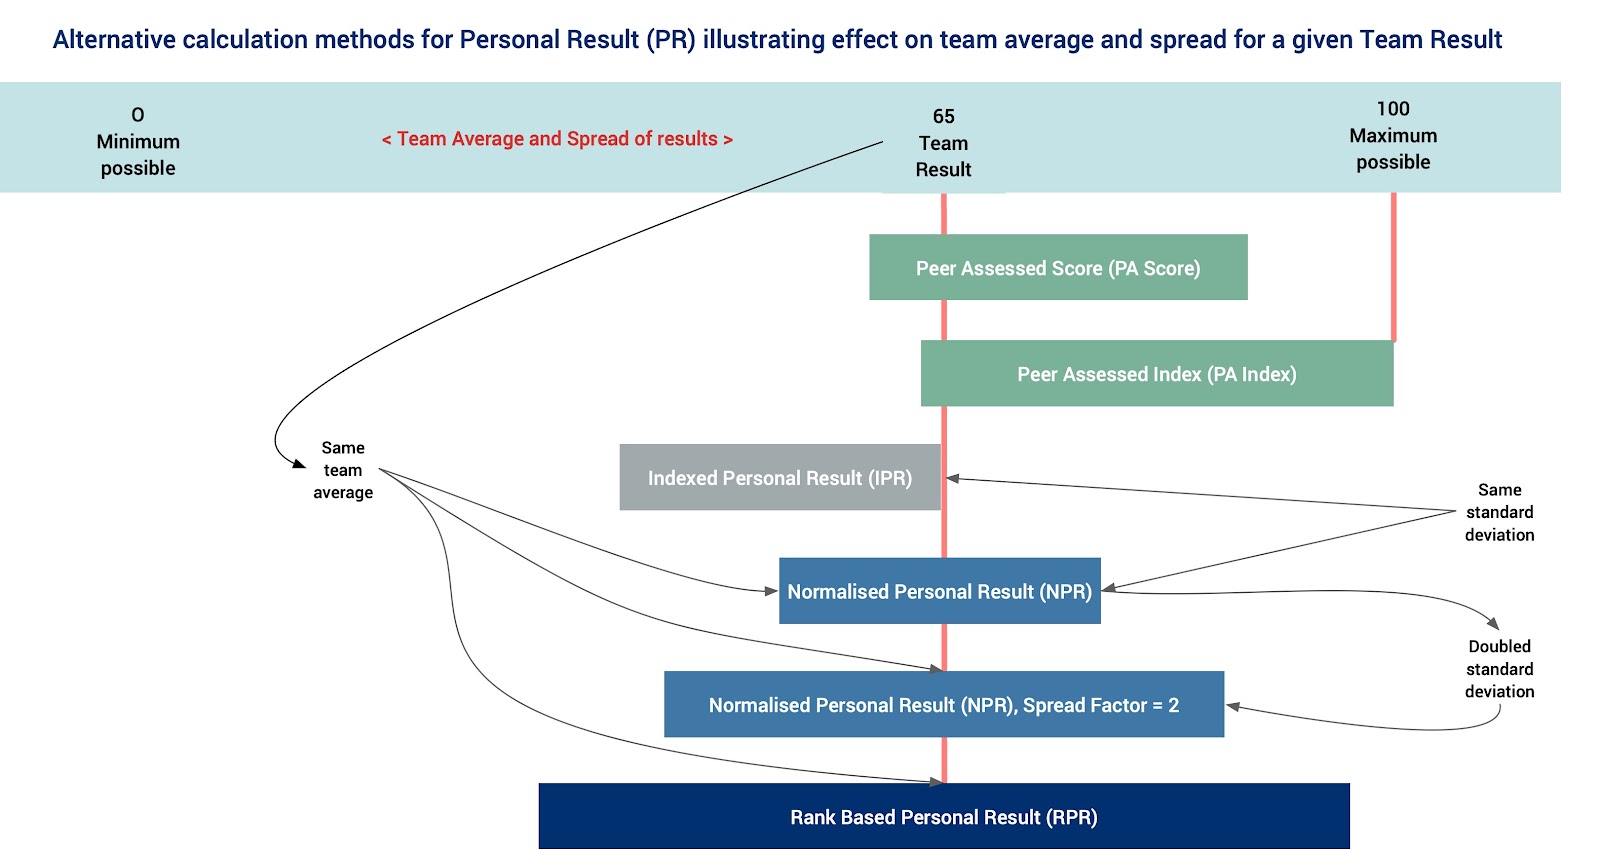
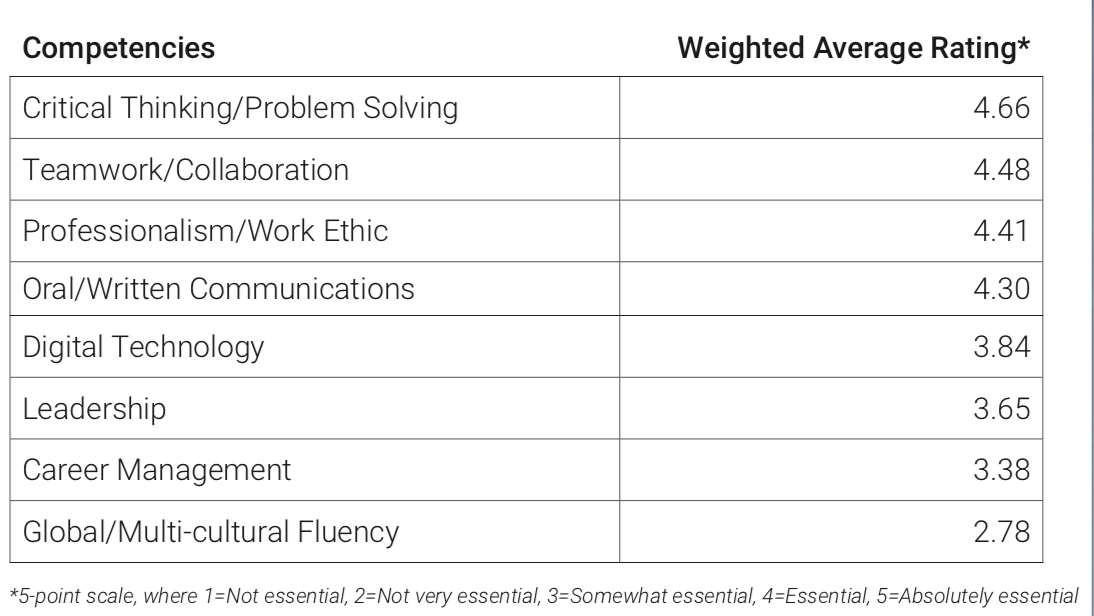
 2. At the end of every activity, the Participant will see an "Activity Finished" page summarising their responses to that activity. In the case of a participant with a Plus account, they will see a button linking them to their Plus account (see image). This will take them to the Plus accounts login form at which they must login, then select "View Results" from the menu.